
How to Clean Air Compressor Filter: Practical Guide for 2026
Learn how to clean air compressor filter media properly in October 2026 to maintain airflow, reduce pump strain, and protect pneumatic tools.
 By Tom Scalisi
Updated October 8, 2026
By Tom Scalisi
Updated October 8, 2026

Restricted airflow into an air compressor pump creates severe cylinder vacuum, elevates pump operating temperatures, and drastically reduces delivered CFM at ninety PSI. When intake air filters load up with airborne workshop dust, sawdust, or paint overspray, the compressor motor must work substantially harder to compress ambient air, increasing cycle times and risking thermal overload shutdowns. Knowing how to clean air compressor filter housings and elements keeps the pump breathing freely while preventing abrasive grit from scoring cylinder walls. Regular maintenance also prevents line pressure drops that cause pneumatic nailers, impact wrenches, and paint guns to starve during heavy duty cycles.
Different compressor configurations rely on distinct filtration technologies, ranging from pleated paper intake elements and washable synthetic foam to sintered brass in-line moisture separators. Using improper washing methods on paper media can tear delicate pleats or collapse the inner core, while neglecting coalescing filters allows moisture and compressor oil to degrade air tool internals. Understanding the exact construction of your intake silencer and in-line moisture trap ensures you service each component without destroying its filtration efficiency. A quick routine inspection keeps equipment running smoothly, extends pump lifespan, and maintains consistent operating pressure across all shop applications.
| Award | Product | ACR Score About ACR ScoreThe ACR Score is our own rating from 0 to 10, based on performance, design and build, ease of use, and value. It reflects independent research and is never influenced by manufacturers, retailers, or affiliate commissions. Learn more › | |
|---|---|---|---|
| Best Overall |
Moisture Boss Air Compressor Intake Filter
|
8.9/10 | Buy |
| Best Budget |
 Darlingao 6-Pack Intake Filter Elements
|
8.8/10 | Buy |
| Best Value |
 NEIKO 30252A 1/4-Inch Water and Oil Separator
|
8.3/10 | Buy |
 Zizlurnar 1/2" NPT Metal Air Compressor Intake
|
8.1/10 | Buy | |
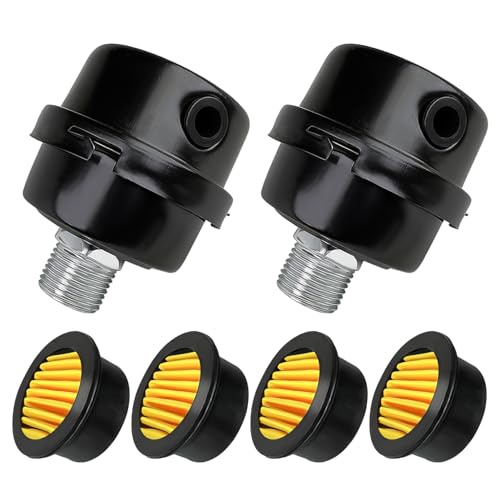 Darlingao 1/2-Inch Male Thread Air Compressor
|
8.0/10 | Buy | |
| Best Premium |
 AIRZOE 1/4-Inch NPT Air Compressor Filter
|
8.0/10 | Buy |
Moisture Boss Air Compressor Intake Filter
This Moisture Boss intake filter cartridge provides 5-micron particulate filtration and a 35 CFM rating to protect compressor pump cylinders from abrasive shop dust. It serves as an exact aftermarket replacement for Solberg 15 style housings on Campbell Hausfeld, Ingersoll Rand, Quincy, and Grainger units.
Pros
- Direct drop-in replacement for widely used Solberg 15 canisters across dozens of major compressor brands
- Effective 5-micron filtration traps fine debris before it causes piston ring scoring or reed valve fouling
- Rigid metallic inner core prevents pleated media from imploding during heavy compressor pumping cycles
- Pliable plastisol end caps compress neatly into canister bases for an airtight edge seal
- Generous 1.12 square foot media surface area allows steady 35 CFM intake flow
Cons
- Filter cartridge only; does not include the metal canister housing, silencing tube, or mounting stud
- Rated for 35 CFM, meaning larger multi-stage industrial pumps may require larger elements or multi-canister setups
- Height specification shows minor variation between 2.31 and 2.5 inches, requiring canister clearance verification
Darlingao 6-Pack Intake Filter Elements
Designed for routine workshop maintenance, these Darlingao replacement paper elements help trap airborne debris while dampening intake noise on compatible compressors and blowers. The multi-pack format supports straightforward, tool-free swaps for machinery accepting 2.32 by 1.97-inch filters.
Pros
- Reinforced paper media with sturdy metal shell
- Dampens operating noise and intake vibration
- Simple tool-free installation onto intake ports
- Convenient multi-pack bundle for ongoing maintenance
Cons
- Requires frequent monthly replacements for peak efficiency
- Requires manual sizing checks before purchase
NEIKO 30252A 1/4-Inch Water and Oil Separator
Designed for pneumatic tools and paint sprayers, this in-line filter traps water vapor, oil, and debris before they reach your equipment. Its transparent housing and brass fittings offer easy monitoring and dependable durability for everyday workshop use.
Pros
- Clear housing for straightforward fluid level checks
- Rugged aluminum body with brass fittings
- Quick-release valve allows fast manual draining
- Universal 1/4-inch NPT inlet and outlet
Cons
- Capped at 90 PSI working pressure
- Requires regular manual draining during extended use
Zizlurnar 1/2" NPT Metal Air Compressor Intake
This 1/2-inch NPT intake silencer set by Zizlurnar features a coated metal housing designed to reduce pump induction noise while filtering ambient dust from intake air. It is a durable, cost-effective replacement for garage DIYers, woodworkers, and mechanics seeking quieter compressor cycles and reliable pump protection.
Pros
- Sturdy coated metal casing resists heat, vibration, and accidental impacts far better than brittle OEM plastic filters
- Standard 1/2-inch NPT threading threads directly onto common compressor intake ports without specialized adapters
- Comes with two spare filter media inserts to extend service intervals before needing new replacement parts
- Quick spin-on installation immediately addresses harsh pump intake noise in enclosed workshop spaces
Cons
- Does not state a specific micron filtration rating, serving primarily as a general particulate screen and sound baffle
- Thread sizing combines 1/2-inch NPT and 20mm callouts, requiring careful pitch verification on imported or metric cylinder heads
- Filter elements require frequent inspection and replacement in high-dust woodworking or metal grinding environments to prevent intake restriction
Darlingao 1/2-Inch Male Thread Air Compressor
This two-pack of Darlingao intake silencer filters features a sturdy coated metal shell, 1/2-inch (20mm) male threads, and replaceable sound-absorbing elements to help dampen pump intake suction roar while keeping ambient dust out. It is a practical replacement for garage DIYers, woodworkers, and maintenance technicians seeking durable metal intake protection.
Pros
- Coated metal housing provides far better impact and heat durability than fragile plastic intake caps
- Includes additional replacement filter media to simplify periodic intake maintenance
- Helps dampen rhythmic intake suction noise across small compressors and shop blowers
- Twin-pack configuration offers great utility for twin-cylinder pumps or keeping a spare on hand
Cons
- Thread specification is listed as 1/2-inch / 20mm, requiring users to verify their pump intake port pitch and threading before purchasing
- Only dampens air intake suction sound and will not reduce mechanical motor hum or reciprocating pump clatter
- Requires regular inspection and element replacement in high-dust woodworking or sanding environments
AIRZOE 1/4-Inch NPT Air Compressor Filter
The AIRZOE AF2000-02M is an in-line 1/4-inch NPT pneumatic moisture filter rated for up to 26.5 SCFM and 145 PSI working pressure. Equipped with a reusable 5-micron brass filter element and a manual push drain, it provides cost-effective particulate and water separation for home garages and small workshops.
Pros
- Reusable 5-micron brass element cleans easily and avoids recurring replacement cartridge costs
- Flow rating of 26.5 SCFM easily accommodates brad nailers, staple guns, and tire inflation tools
- Compact footprint and standard 1/4-inch NPT threads simplify installation on compact air setups
- Straightforward manual drain valve allows fast water discharge at the end of a project
Cons
- Manual drain requires regular visual inspection and manual release rather than draining automatically
- Flow capacity of 26.5 SCFM is not suited for continuous high-demand tools like sandblasters or dual-action sanders
- Does not replace a desiccant dryer for critical moisture-free tasks like professional automotive spray painting
Step-by-Step Air Compressor Filter Service and Maintenance
Pneumatic machinery relies on a steady volume of clean, particle-free air to function efficiently and avoid premature internal wear. When you learn how to clean air compressor filter assemblies correctly, you protect delicate intake reed valves, piston rings, and cylinder walls from abrasive particulates. Neglected filters choke the pump intake, forcing the electric motor to run longer recovery cycles and generate excessive heat.
Air compressor filtration systems generally encompass two distinct protective stages across a typical workshop setup. The first defense is the ambient intake filter mounted directly on the pump head, while the second is an in-line moisture or particulate separator positioned along the air line. Both filtration stages encounter different forms of contamination and demand specialized cleaning techniques. Treating every filter media identically often results in ruined components and compromised pneumatic tool performance.
Distinguishing Intake Filters from In-Line Moisture Traps
Intake air filters capture airborne dust, sawdust, and ambient debris before air enters the compression cylinder. These units commonly feature pleated paper elements, synthetic KS media with plastisol molded caps, or porous foam rings enclosed in a silencer muffler. Because they operate dry on the suction side, maintenance primarily involves clearing particulates without ripping the porous structure. Intake filters do not handle pressurized air, allowing housings to be unthreaded or unsnapped easily by hand.
In contrast, in-line filters and water separators manage pressurized discharge air downstream from the tank. Units like the NEIKO separator or the AIRZOE filter utilize clear polycarbonate bowls and sintered brass elements rated at five microns. These downstream units separate condensed water, aerosolized oil, and pipe scale before air reaches tools. Servicing in-line filters requires depressurizing the line completely and removing liquid reservoirs before extracting the internal element.
Clear Symptoms of a Clogged Air Compressor Filter
A clogged intake filter manifests clear operational symptoms before the compressor pump experiences mechanical damage. The most common early indicator is an extended tank recovery time from cut-in pressure to shut-off. When air passages clog with dust, volumetric efficiency drops, forcing the pump to cycle longer to produce standard CFM output. You may also observe elevated cylinder head temperatures and an unusually deep motor hum during continuous cycles.
Electrical issues can also trace back directly to restricted intake filtration on standard household branch circuits. As the pump struggles against suction vacuum, the motor draws higher continuous running amperage, occasionally tripping fifteen-amp breakers during extended runs. Downstream pneumatic tools like sanders or framing nailers will exhibit noticeable power loss due to inadequate sustained air volume. If your compressor runs continuously without reaching factory cut-out pressure, check the intake element first.
Preparing the Compressor Safely Before Filter Service
Servicing any pneumatic filter begins with thorough safety preparation to prevent electrical hazards and accidental pressure release. Always turn the main pressure switch to the off position and unplug the power cord from the outlet. If your unit is hardwired to a dedicated workshop circuit, switch off the breaker before touching components. Allowing the compressor pump and cylinder head to cool completely is essential, as metal heads retain severe operating heat.
Depressurization is equally vital when servicing in-line moisture separators, air line filters, or manifold accessories. Pull the safety relief valve ring gently to verify the tank is not under pressure, and open the bottom drain valve to evacuate stored air and condensation. Never attempt to unthread an in-line filter bowl while line pressure remains in the hose or piping. Once the pressure gauge reads zero PSI and the pump is cool, you can safely disassemble the housing.
Servicing Pleated Paper Intake Filter Elements
Pleated paper filters, such as replacement elements used in universal silencer mufflers or Moisture Boss assemblies, feature delicate cellulose or KS media supported by an inner core. These paper elements are strictly dry-service components and must never be submerged in water, degreasers, or solvents. Liquid moisture softens paper fibers, causing pleats to swell, mat together, and permanently restrict airflow once dry. To clean a paper element, remove it from the housing and inspect the surface for grease staining or tears.
Begin dry cleaning by tapping the filter end cap gently against a clean wooden workbench or your palm. This light vibration dislodges loose crusts of sawdust, drywall dust, and abrasive grit trapped within the outer pleats. Rotate the element slowly during tapping to ensure even particulate shedding around the circumference. Avoid striking the filter against hard steel edges, as denting the metal core or cracking the plastisol end cap ruins the internal seal.
Next, use a low-pressure air blow gun adjusted to approximately twenty to thirty PSI to blow out embedded dust from the inside out. Direct the nozzle against the inner core, sweeping air outward through the pleats toward the dirty face. Never direct high-pressure air against the outside of the filter, as forcing particulates deeper permanently binds the media. If grease or pump oil mist coats the paper pleats, cleaning will not restore airflow, and the element must be replaced.
Washing Foam and Synthetic Pre-Filter Media
Many workshop compressors incorporate open-cell polyurethane foam pre-filters or washable synthetic rings wrapped around the primary intake element. Unlike paper elements, durable foam media handles wet washing methods exceptionally well when cleared of surface grime. Remove the foam sleeve from the intake canister and inspect the material for dry rot, crumbling edges, or chemical hardening. If the foam remains pliable and structurally sound, you can recondition it through a quick bath in warm, soapy water.
Submerge the foam element in a container filled with warm water mixed with a mild dishwashing detergent or citrus cleaner. Squeeze the foam gently with your hands to flush out embedded grit, sawdust, and oily film throughout the cellular matrix. Never twist, wring, or stretch the foam aggressively, as wet open-cell foam tears easily under excessive stress. Rinse the element thoroughly under clean running water until all residual soap suds and dirt particles wash away completely.
Allow the washed foam element to air dry completely on a lint-free towel in a well-ventilated area before reinstalling it. Reinstalling damp foam onto an intake allows moisture to be drawn into the pump cylinder, risking valve plate oxidation and contaminated air. Do not use open flames, heat guns, or high-temperature ovens to accelerate drying, as synthetic foam shrinks and melts at elevated heat. Once fully dry, inspect the foam to confirm full flexibility before slipping it back over the core.
Cleaning Sintered Brass and In-Line Water Separators
In-line filters like the AIRZOE AF2000-02M or NEIKO separator rely on rigid porous brass elements to extract water droplets and micro-particles from delivery air. Sintered bronze and brass elements offer substantial structural durability, five-micron filtration performance, and indefinite reusability when maintained properly. To clean an in-line unit, twist off the transparent collection bowl and unscrew the lower retaining baffle holding the brass element. Take care not to damage internal rubber O-rings or the spring-loaded manual drain mechanism during disassembly.
Place the sintered brass filter element into a small container filled with clean mineral spirits, denatured alcohol, or an ultrasonic cleaning solution. Agitate the fluid gently to dissolve stubborn oil varnish, grease deposits, and gummy moisture residue trapped within the microscopic pores. Allow the element to soak for fifteen to twenty minutes so the solvent thoroughly penetrates deep contamination channels. A soft-bristled nylon brush can be used on the exterior to scrub away persistent grime without scratching the metal pores.
After soaking, blow through the brass element from the clean inside face outward using a dry compressed air blow gun. This reverse blast expels dissolved oil and loose particulates from the porous structure into a rag. Inspect the transparent bowl for cracks, wiping the plastic interior with warm water and mild soap rather than harsh solvents that cause crazing. Lightly lubricate the bowl O-ring with silicone grease before reassembling the clean brass element and torquing the bowl hand-tight.
Maintaining Metal Silencer Housings and Intake Ports
Intake silencers, like those manufactured by Darlingao and Zizlurnar, combine heavy-duty metal shells with sound-dampening chambers and threaded male ports. Over months of shop use, exterior intake louvers and interior housing cavities accumulate thick coatings of dust and ambient oils. When servicing the filter element, remove the entire silencer assembly from the cylinder head to clean the canister thoroughly. Unthread the silencer carefully to avoid cross-threading the aluminum intake port on the compressor pump head.
Wipe down the interior and exterior metal surfaces of the silencer housing using a rag moistened with a mild degreasing solvent. Check the internal sound baffles and threaded connections to ensure metal shavings or loose paint chips do not linger inside the clean chamber. Any particulate matter left loose inside the silencer housing will be pulled directly into the intake valves when the compressor runs. Use a dry, lint-free cloth to ensure the canister is completely dry before inserting the filter element.
Inspect the male pipe threads on the silencer base for galling, stripped threads, or degraded thread sealant tape. Wrap fresh PTFE thread seal tape clockwise around standard NPT male threads, leaving the bottom two threads exposed to prevent stray tape shreds from entering the head. Thread the silencer canister into the cylinder head intake port until snug, taking care not to over-tighten into soft aluminum castings. A firmly seated, leak-free intake silencer keeps incoming air routed entirely through the filter element while suppressing suction noise.
Severe Cleaning Mistakes That Ruin Filter Assemblies
One of the most damaging mistakes workshop owners make is using excessive air pressure when blowing out paper intake filters. Directing ninety to one hundred PSI from a standard nozzle directly onto delicate paper pleats easily ruptures microscopic paper fibers. Even tiny, invisible tears in the media create bypass channels that allow fine abrasive dust to reach the cylinder bore. Always regulate your blow gun supply down to low pressure, and maintain a safe distance between the nozzle tip and the filter face.
Another frequent error involves soaking paper filter elements in solvent, gasoline, or water to remove oil film. Paper elements lack water-resistant bonding agents, meaning liquid exposure breaks down the KS media binder, turning the filter element into a pulpy, restrictive mass. Similarly, coating standard compressor foam with automotive motor oil or tacky air filter oil is counterproductive for compressor intakes. Sticky oil droplets can detach under high suction velocities, entering the cylinder where they carbonize onto hot discharge reed valves.
Reassembling filter housings without inspecting elastomeric seals and O-rings also leads to severe operating problems. A crushed, torn, or improperly seated rubber gasket allows dirty ambient air to slip past the filter perimeter, bypassing filtration completely. In-line separators will suffer continuous high-pressure air leaks around bowl threads if O-rings are pinched or omitted during reassembly. Always inspect rubber seals closely for splits, clean their mating grooves, and replace damaged gaskets promptly to maintain an airtight system.
Establishing Inspection Schedules and Replacement Rules
Establishing a consistent maintenance schedule prevents intake choking and protects your air delivery system from preventable performance drops. For home workshops and hobby garages operating under normal conditions, inspecting intake filters every thirty to sixty operating days is generally sufficient. In dusty environments involving woodworking, drywall sanding, or masonry cutting, intake filters should be checked weekly or monthly. In-line water traps and moisture separators require regular bowl drainage and monthly element inspection to ensure clean air delivery to tools.
Knowing when to stop cleaning and simply install a replacement filter element is equally critical for long-term compressor reliability. Paper elements should be replaced immediately if they show signs of oil saturation, deep discoloration that cannot be blown out, torn pleats, or warped end caps. Most intake filter manufacturers recommend replacing paper filter elements after two to three gentle cleanings, or at least once or twice per year. Multi-pack replacements like Darlingao element sets provide an affordable way to keep fresh filters on hand without risking cylinder wear.
Regular filter maintenance combined with daily receiver tank moisture purging forms the foundation of reliable compressor ownership. Taking five minutes to inspect intake media, clean silencer housings, and recondition sintered brass elements keeps your pneumatic tools running at peak power. A clean, freely breathing compressor motor runs cooler, achieves faster recovery times, and delivers dependable air volume for years of demanding projects.
About the author
Tom Scalisi brings more than two decades of experience in construction, building maintenance, contracting, and hands-on tool use. His practical understanding of power tools, automotive work, repairs, and jobsite equipment helps readers evaluate compressors based on real workloads rather than specifications alone.