
How to Add an Extra Tank to Air Compressor: Practical Guide for 2026
Learn how to add an extra tank to air compressor safely using proper plumbing, relief valves, and drain hardware in this complete October 2026 workshop guide.
 By Bob Beacham
Updated October 7, 2026
By Bob Beacham
Updated October 7, 2026

Running continuous or high-demand pneumatic tools often pushes small compressor tanks past their physical limits. When an impact wrench, spray gun, or die grinder drains your air volume faster than the motor can recover, learning how to add an extra tank to air compressor offers a practical way to expand your usable air storage without replacing your entire machine. An auxiliary air receiver acts as a secondary storage buffer, capturing pressurized air during idle cycles so your workshop can handle larger bursts of pneumatic demand. This setup helps smooth out line pressure fluctuations and prevents rapid pressure drops during demanding shop tasks.
Connecting an external air vessel requires careful planning around pneumatic plumbing, maximum operating pressure ratings, and proper moisture drainage. Many woodworkers and auto mechanics use specialized hardware, including solid brass manifolds, safety relief valves, and extended drain assemblies from brands like SUNROAD, Hromee, and QWORK to maintain secure connections. Understanding how an added air reservoir interacts with your pump cycle times, electrical motor duty cycles, and condensation management ensures that your workshop remains both productive and safe.
| Award | Product | ACR Score About ACR ScoreThe ACR Score is our own rating from 0 to 10, based on performance, design and build, ease of use, and value. It reflects independent research and is never influenced by manufacturers, retailers, or affiliate commissions. Learn more › | |
|---|---|---|---|
| Best Overall |
SUNROAD Air Tank Repair Kit with 4-Ft Hose
|
9.2/10 | Buy |
| Best Budget |
 Hromee 5-Piece 1/4-Inch Drain Valve Kit
|
8.9/10 | Buy |
 SUNROAD 10-Inch Compressor Tank Drain Kit
|
8.3/10 | Buy | |
| Best Value |
 QWORK 10-Inch Tank Drain Valve Kit
|
7.8/10 | Buy |
SUNROAD Air Tank Repair Kit with 4-Ft Hose
Designed for refurbishing portable air tanks, this all-in-one assembly combines a solid brass manifold, an easy-to-read 200 PSI gauge, and a flexible four-foot hose. It offers a practical fix for garage mechanics and DIYers needing to replace leaky or worn tank components.
Pros
- Includes manifold, gauge, hose, and thread seal tape
- Easy-to-read 2-inch dual-unit dial gauge
- Corrosion-resistant solid brass connections ensure reliable sealing
- Flexible PVC hose rated up to 300 PSI
Cons
- Short four-foot hose restricts working radius
- Requires 1/2-inch MNPT port or additional adapters
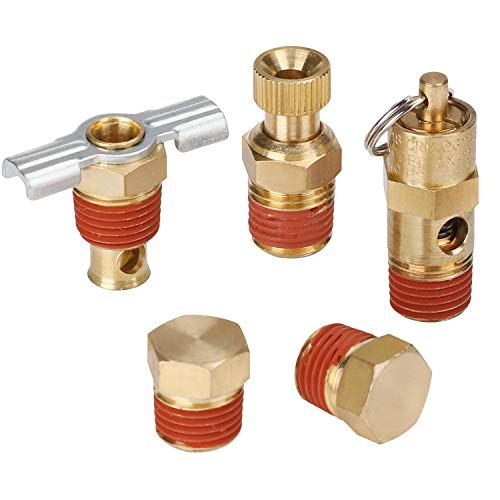
Hromee 5-Piece 1/4-Inch Drain Valve Kit
This brass fitting assortment provides essential replacement valves and plugs for routine compressor tank maintenance. It pairs winged and knurled drain petcocks with a 140 PSI safety relief valve for dependable pneumatic management.
Pros
- Solid brass body provides corrosion and heat resistance
- Two petcock styles offer flexible moisture draining options
- Integrated safety valve handles up to 55 SCFM flow
- Stainless steel relief components resist rust over time
Cons
- Requires separate thread sealant for proper sealing
- Safety valve maximum pressure is capped at 140 PSI
- Winged drain handle has a 12-pound torque limit
SUNROAD 10-Inch Compressor Tank Drain Kit
Draining moisture prevents compressor tank rust, and this SUNROAD kit simplifies routine maintenance with a flexible braided steel line and an accessible quarter-turn shutoff. It provides a practical upgrade for standard 1/4-inch and 3/8-inch drain ports operating under 175 PSI.
Pros
- Durable braided steel hose prevents kinks
- Corrosion-resistant chrome-plated brass valve
- Complete installation kit with clamps and tape
- Rubber-coated handle allows easy quarter-turn operation
Cons
- 10-inch hose may be short for large tanks
- Working pressure is limited to 175 PSI
- Requires manual operation after every compressor use
QWORK 10-Inch Tank Drain Valve Kit
This braided steel extension kit simplifies tank draining by relocating hard-to-reach compressor valves. Rated up to 175 PSI and packaged with an adapter, it offers a reliable setup for standard workshop compressors.
Pros
- Corrosion-resistant braided steel construction
- Pre-applied sealant speeds up installation
- Includes adapter for 3/8-inch ports
- Handles up to 175 PSI reliably
Cons
- Fixed 10-inch length restricts mounting flexibility
- Not rated for high-pressure industrial systems
Complete Technical Guide to Plumbing an Auxiliary Air Tank
Adding an extra air tank to an existing compressor system is one of the most effective modifications for expanding workshop capabilities. This setup provides an immediate air reserve that allows pneumatic tools to run longer before experiencing severe line pressure drop. However, connecting pressurized vessels requires a strict understanding of pneumatic principles, safe component selection, and mechanical plumbing. By following proper installation methods and integrating correct safety valves, you can build a reliable dual-tank system that handles demanding shop projects smoothly.
Understanding Air Storage Buffers versus Pump CFM Delivery
Many compressor owners assume that adding a secondary air receiver increases the overall air output of their machine. In reality, adding an auxiliary vessel increases total storage volume in gallons, but it does not change the pump delivery volume measured in cubic feet per minute at 90 PSI. The compressor pump produces the exact same volume of compressed air regardless of whether it fills a single six-gallon tank or a linked thirty-gallon array. What changes is the operational buffer, giving you a deeper reservoir of stored energy for high-draw intermittent tools.
An increased storage buffer directly benefits pneumatic tools that operate in short, intense bursts rather than continuous duty cycles. Heavy air tools like impact wrenches, framing nailers, and plasma cutters consume high volumes of air for brief periods. A larger reserve prevents line pressure from plummeting below the operating threshold during these heavy bursts. Conversely, tools requiring continuous air flow like rotary sanders or paint sprayers will still deplete the storage reserve if the pump cannot match their continuous CFM consumption.
Safety Foundations: Pressure Ratings and Essential Relief Valves
Pneumatic safety begins with verifying that every tank, pipe fitting, and hose assembly matches or exceeds the cut-out pressure of your primary compressor. Compressed air stores tremendous potential energy, making component structural integrity critical to prevent mechanical rupture. If your primary compressor cuts out at 150 PSI, your secondary vessel must carry a working pressure rating safely above that threshold. Never use discarded propane tanks, water heater cylinders, or unrated metal containers as auxiliary pneumatic pressure vessels.
Every isolated air vessel in a pneumatic network must feature its own independent safety relief valve. If a shutoff valve between the primary and secondary tank is closed while the secondary vessel remains under pressure, heat expansion or backpressure could cause severe hazards without a dedicated release. Standard safety valves, such as the 140 PSI brass safety valve included in the Hromee fitting kit with its stainless steel spring and pull ring, activate automatically if pressure exceeds safe limits. Matching the relief valve pressure rating to the lower-rated vessel in your system ensures reliable mechanical protection across the entire line.
Auxiliary Tank Selection and Configuration Approaches
Selecting the right auxiliary vessel depends largely on whether your workshop requires a permanent stationary installation or portable flexibility. Dedicated air receivers typically feature multiple threaded ports on the tank bung, which simplifies installing dedicated inlet, outlet, and drain fittings. Alternatively, many DIY mechanics convert standalone portable carry tanks into auxiliary storage buffers. Portable carry tanks allow you to disconnect the reservoir when you need a mobile air supply for inflating vehicle tires away from your main workbench.
When configuring the connection between two tanks, you must decide whether to plumb them in parallel or in series. Parallel plumbing connects both tanks directly to a common distribution line before the regulator, allowing them to equalize pressure evenly and fill at the same rate. Series plumbing feeds air from the primary compressor discharge directly into the auxiliary tank, which then supplies the regulated tool line. Parallel plumbing is generally favored in home workshops because it provides balanced airflow and minimizes line restriction during heavy discharge.
Step-by-Step Plumbing: Connecting the External Tank
Before beginning any plumbing work, disconnect the compressor from its electrical power source and release all stored air pressure completely. Pull the safety relief valve ring and open the drain valve until the tank pressure gauge reads zero PSI. Inspect the primary tank manifold to locate an unregulated port, typically a 1/4-inch or 3/8-inch national pipe taper connection located ahead of the regulator. Tapping into unregulated tank pressure ensures the auxiliary vessel stores air at maximum system capacity.
Apply quality thread sealant tape or paste to all male pipe threads before threading brass fittings together. Clean brass hex plugs, such as the solid brass 1/4-inch male NPT plugs found in the Hromee fitting kit, can terminate unused bung ports cleanly. Thread your brass tee fitting or manifold block securely into the unregulated port using appropriate open-end wrenches. Avoid over-tightening brass components into cast metal bungs, as excessive torque can crack fittings or strip tapered threads.
Connect the primary tank tee to the auxiliary tank using heavy-duty air line, rigid copper tubing, or reinforced hose rated for high pneumatic pressure. Standard thin-wall PVC or lightweight utility hoses can suffer dynamic pressure drop or heat degradation if placed too close to hot pump discharge tubes. Ensure the interconnecting line has an internal diameter of at least 3/8 inch to facilitate unrestricted air movement between the two vessels during rapid cycling. Fasten routing clamps or vibration-damping clips along the line to prevent metal fatigue caused by compressor motor vibration.
Incorporating Gauge Assemblies and Manifold Controls
A dedicated manifold assembly on the auxiliary tank gives you direct control over stored pressure and isolated shutoff. All-in-one repair and manifold kits, such as the SUNROAD portable carry tank assembly, provide a practical hardware solution for this connection. This assembly incorporates a heavy-duty brass manifold with a 1/2-inch male NPT tank connection, an aluminum on-off knob, a built-in safety relief valve, and an outlet port. Having an aluminum shutoff knob allows you to isolate the auxiliary tank when you only need the smaller primary tank for light-duty brad nailing.
Monitoring tank storage levels requires an accurate pressure gauge installed directly on the secondary reservoir. The SUNROAD kit includes an oversized two-inch dial displaying readings up to 200 PSI and 1.4 MPa with a bottom 1/8-inch connection. A clearly visible gauge helps you verify that both tanks are equalizing properly without guessing based on the primary compressor console. In addition, the kit provides a four-foot PVC hose rated for 300 PSI max working pressure with solid brass ends and a tire chuck, adding immediate inflation utility to your auxiliary setup.
Managing Doubled Condensation with Extended Drain Valves
Compressing ambient air naturally generates heat and moisture, which condenses into liquid water inside storage vessels as the air cools. Doubling your storage capacity by adding an extra tank directly doubles the interior surface area where moisture can accumulate. Water left inside an air tank accelerates internal steel corrosion, weakens tank walls over time, and contaminates downstream pneumatic lines. To preserve vessel structural integrity, both the primary compressor and the auxiliary tank must be drained after every work session.
Factory thumb petcocks and winged drain cocks are frequently awkward to access, which discourages regular maintenance. Replacing stiff petcocks with extended drain assemblies dramatically simplifies daily moisture draining routines. The SUNROAD extended drain valve kit provides a ten-inch flexible braided steel hose with 1/4-inch NPT threads, a pre-sealed 1/4-inch elbow, a 3/8-inch adapter, and a chrome-plated brass quarter-turn ball valve rated to 300 PSI. The braided steel hose resists kinks and handles working pressures up to 175 PSI with a 475 PSI blasting threshold, allowing you to route the drain handle out to an accessible location.
Similarly, the QWORK extended tank drain assembly features a ten-inch braided steel line with a brass head, 1/4-inch NPT connections, and a brass 3/8-inch bushing adapter for larger drain bungs. It shares the same 175 PSI maximum working pressure and 475 PSI burst rating, safely containing standard workshop pressures. Securing the drain valve with rubber-wrapped routing clamps dampens motor vibration and prevents the ball valve from vibrating loose. Opening the lever handle for a few seconds at the end of the day purges trapped water and particulate sludge cleanly.
Pressure Testing, Leak Detection, and First Pressurization
Once all plumbing connections, gauges, safety valves, and drain lines are tightened, perform a methodical leak test before regular tool use. Close all drain valves completely and connect the compressor to electrical power. Turn the power switch on and allow the pump to run until it pressurizes both vessels to the factory cut-out threshold. Listen carefully for faint hissing sounds around threaded joints, quick-couplers, and hose barbs as the system approaches full pressure.
Apply a solution of mild liquid dish soap and water to every joint, valve seat, and threaded connection using a spray bottle or small brush. If bubbles expand or multiply at any connection, that fitting has an active pneumatic leak. Small micro-leaks cause the compressor to cycle intermittently even when tools are idle, causing unnecessary motor wear and wasting electrical power. If you detect a leak, depressurize the system fully, loosen the fitting, reapply thread seal tape, and retighten the joint securely before testing again.
Motor Duty Cycles, Recovery Times, and Thermal Protection
While an extra tank provides valuable air storage, it places increased continuous mechanical demand on the compressor pump and electric motor. Because the combined volume is larger, the initial fill time from zero PSI to cut-out pressure will take significantly longer. Likewise, recovery cycles from cut-in to cut-out will run longer than they did with a single small tank. If your compressor motor is rated for an intermittent fifty percent duty cycle, running the pump continuously to fill multiple tanks can cause thermal overload.
Pay close attention to motor temperature during initial setups, especially on budget oil-free universal motor compressors. Most modern electric compressors include a thermal overload protector that trips automatically to protect internal motor windings from overheating. If your motor shuts down unexpectedly during a long fill cycle, let it cool completely before pressing the manual reset button. To prevent thermal stress, allow the compressor adequate resting time between heavy operational cycles, or use isolation ball valves to take the auxiliary tank offline when running small pneumatic nailers.
Long-Term Maintenance and Safe Operational Routines
A properly plumbed multi-tank pneumatic setup requires consistent operational habits to deliver safe, reliable service over years of workshop use. Make a habit of testing safety relief valves periodically by gently pulling the manual pull ring while the system contains low pressure. The Hromee brass safety valve features a stainless steel ring specifically designed for this manual verification check. Confirming that the spring-loaded plunger moves freely prevents the valve from seizing due to internal moisture or debris.
Inspect all interconnecting hoses and braided steel drain lines regularly for signs of abrasion, kink damage, or dry rot. Keep the threads on portable tank fittings clean, and store portable auxiliary tanks in dry, temperature-stable indoor environments. Combining routine moisture draining, periodic leak checks, and mindful duty cycle management allows your expanded air storage system to deliver consistent pneumatic power across all your automotive, woodworking, and fabrication tasks.
About the author
Bob Beacham is an experienced tools and workshop writer with deep knowledge of power equipment, mechanical systems, and practical DIY applications. His coverage of air compressors, welding equipment, saws, and workshop tools helps translate technical specifications into useful guidance for homeowners and serious DIYers.