
How to Disconnect Nail Gun From Air Compressor: A Practical Guide for 2026
Learn how to disconnect nail gun from air compressor safely with step-by-step hose depressurization, coupler release tips, and tool care advice for October 2026.
 By Tony Carrick
Updated October 7, 2026
By Tony Carrick
Updated October 7, 2026
High-pressure air lines operating between 70 and 120 PSI store significant kinetic energy that can startle an unprepared operator during tool swaps. A sudden loud hiss, a violent burst of pressurized air, or an uncontrolled hose whip can damage delicate trim work or cause physical injury. Learning how to disconnect nail gun from air compressor setups properly ensures your pneumatic tools remain in peak operating condition while keeping your garage or jobsite completely safe. Taking a deliberate approach to disengaging your pneumatic couplers prevents unexpected fastener discharge and prolongs the lifespan of internal O-rings.
Pneumatic nailers feature internal driver pistons and sensitive trigger assemblies that remain primed whenever pressurized air fills the cylinder chamber. Disconnecting the tool while under line pressure requires understanding how quick-connect sleeves function and how residual pressure vents from the tool exhaust. Whether you are running a lightweight brad nailer on a quiet portable compressor or framing with a heavy-duty strip nailer, consistent disconnection habits protect delicate surfaces and preserve tool integrity. Following the correct sequence prevents hose damage, minimizes coupler wear, and keeps your pneumatic workspace operating smoothly.
| Award | Product | ACR Score About ACR ScoreThe ACR Score is our own rating from 0 to 10, based on performance, design and build, ease of use, and value. It reflects independent research and is never influenced by manufacturers, retailers, or affiliate commissions. Learn more › | |
|---|---|---|---|
| Best Overall |
Metabo HPT NR38AK Metal Connector Nailer
|
9.2/10 | Buy |
| Best Budget |
 Valu-Air T64C 16-Gauge Finish Nailer
|
8.6/10 | Buy |
 Senco PC0947 18-Gauge Brad Nailer Combo Kit
|
8.1/10 | Buy |
Metabo HPT NR38AK Metal Connector Nailer
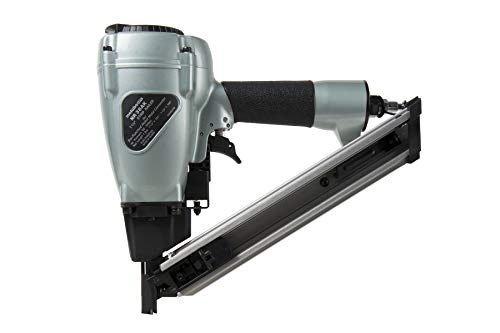
Built for securing structural hardware to wood framing, this compact nailer pairs a 4.6-pound frame with sequential actuation for exact hole placement. A dedicated positive safety design uses the fastener tip to align each shot cleanly without damaging collation strips.
Pros
- Extremely lightweight at only 4.6 pounds
- Positive safety guides nails into connector holes
- Dry fire lockout prevents blank firing
- Adjustable exhaust deflector directs air safely
Cons
- Limited strictly to 1-1/2-inch fasteners
- Sequential drive lacks rapid bump firing
- Optimized primarily for Metabo HPT fasteners
Valu-Air T64C 16-Gauge Finish Nailer
Designed for trim, molding, and cabinetry, the Valu-Air T64C drives 16-gauge fasteners with a rugged aluminum build. It delivers dependable pneumatic nailing for DIYers and woodworkers who already own an air compressor.
Pros
- Lightweight four-pound body reduces overhead fatigue
- Durable heat-treated aluminum construction
- Convenient 360-degree adjustable air exhaust deflector
- Comes with protective carrying case and essential maintenance accessories
Cons
- Requires a standalone air compressor to function
- Pneumatic hose connection limits overall jobsite mobility
Senco PC0947 18-Gauge Brad Nailer Combo Kit
Combining an oil-free 135 PSI compressor with a lightweight 18-gauge brad nailer, this all-in-one setup suits interior trim work and DIY woodworking. Its ultra-quiet 68 dBA motor and maintenance-free design make it well-suited for indoor trim carpentry.
Pros
- Quiet 68 dBA compressor operation
- Oil-free design eliminates routine lubrication
- Selectable trigger for multiple firing modes
- Includes hose, fasteners, and safety glasses
Cons
- Coil hose design can tangle during use
- Entire kit weighs 30 pounds to transport
- Restricted to 18-gauge straight glued strip nails
Step-by-Step Pneumatic Safety and Nailer Disconnection Guide
Disconnecting a pneumatic nail gun requires releasing pressurized airflow without damaging internal driver seals or risking sudden hose whip. Many DIY woodworkers and trim carpenters assume that pulling the hose collar is a trivial task, yet handling compressed air at 70 to 120 PSI always involves potential mechanical energy. Taking a methodical approach preserves the longevity of your quick-connect couplers, keeps O-rings seated properly, and prevents accidental misfires. Mastering the correct sequence turns an everyday workshop routine into a safe, reliable habit.
The Mechanics of Pneumatic Pressure and Quick-Connect Couplers
Pneumatic fastening systems rely on a closed circuit of compressed air to transfer kinetic force to an internal driver piston. At the end of the air hose, a female quick-connect coupler seats around a male industrial plug threaded into the tool handle. Inside that female coupler, a ring of small steel ball bearings locks into a machined channel around the perimeter of the male fitting. As long as air pressure fills the supply line, that line pressure pushes outward against the internal valve mechanism to keep the seal airtight.
Disconnecting the tool requires overcoming both mechanical friction and outward air pressure acting on the internal sealing valve. The sliding outer collar of the female coupler acts as a gate that keeps the locking balls held securely inward. Sliding that collar backward allows the ball bearings to retreat outward into internal channels, which releases the male plug. The sudden pop and hiss you hear during detachment occurs as the small volume of pressurized air trapped in the nailer cap vents into the open atmosphere.
Essential Safety Preparation Before Detaching Any Air Line
Safe disconnection begins long before your fingers touch the metal coupler sleeve on your air hose. You must always maintain strict trigger discipline by keeping your index finger completely outside the trigger guard. Point the nose of the nail gun toward an empty, solid surface rather than your feet or other people working nearby. Even if you believe the magazine is empty, an unfired fastener could remain seated directly under the driver blade.
Never attempt to clear a jam or adjust the depth of drive while the air hose remains connected to the tool inlet. Pressurized nailers can cycle unexpectedly if the contact safety element is depressed against an object while pressure fluctuates. Many advanced tools feature dry fire lockout systems designed to prevent blank cycling when fasteners run out. However, mechanical lockouts should never serve as a substitute for physical air disconnection before servicing your equipment.
Step-by-Step Procedure for Disconnecting at the Tool Fitting
Grasp the handle of the nail gun firmly with your primary hand while resting the nosepiece safely on your work table. With your secondary hand, wrap your fingers securely around the knurled sliding collar of the female hose coupler. Push the hose fitting slightly forward into the nail gun inlet before pulling the sleeve backward toward the hose. This slight forward motion relieves mechanical tension against the internal ball bearings and makes the collar slide much easier.
Pull the coupler collar backward in one smooth, deliberate motion away from the nail gun body. The male plug will instantly pop out of the coupler socket with a brief, sharp hiss of escaping air. Keep a firm grip on the air hose so it does not jump or swing wildly across your workbench when released. Once detached, place the nail gun flat on a secure surface where it cannot fall or suffer impact damage.
Troubleshooting Stubborn or High-Pressure Couplers
High line pressure inside the hose can sometimes lock the ball bearings tightly against the male plug, causing the coupler collar to feel completely frozen. If the sleeve refuses to slide backward with normal hand pressure, never reach for channel locks, pliers, or a hammer to force it. Forcing the fitting can easily burr the brass collar or deform the male nipple, creating permanent air leaks. Instead, focus on removing the pressure source before attempting to manipulate the stuck connection again.
You can release line pressure by shutting off your air compressor and turning the pressure regulator knob counterclockwise until line pressure drops to zero. Alternatively, opening a quick-drain relief petcock or triggering an air blowgun attached to an adjacent manifold port will vent trapped line air safely. Once internal line pressure drops, the coupler collar should slide back smoothly with minimal thumb effort. If the sleeve still sticks when unpressurized, apply a drop of light machine oil to the ball race to dissolve accumulated jobsite dust.
Managing Air Pressure at the Compressor Regulator and Manifold
Many workshop tasks require unhooking the entire hose from the compressor rather than just separating the nailer. Before detaching a hose from the compressor manifold, adjust the regulated line pressure gauge to zero or turn the power switch off. Releasing a hose that still contains 120 PSI of stored energy can cause violent hose whipping as the line rapidly empties. Holding the hose securely within six inches of the fitting provides the physical leverage needed to retain control during decoupling.
Portable systems like the SENCO Pneumatic Brad Nailer 18 Gauge combo kit feature compact PC1010 compressors with ultra-quiet 68 dBA motors and 135 max PSI capabilities. These setups frequently run lightweight 1/4-inch by 25-foot coil hoses that store minimal air volume but recoil quickly if released carelessly. Controlling hose retraction helps prevent the brass fittings from striking surrounding woodwork or painted trim. Always vent the regulator gauge pressure before packing up your compressor and hose assembly at the end of the day.
Post-Disconnect Tool Care and Lubrication Protocols
The moments immediately following air line disconnection present the ideal opportunity to perform routine tool lubrication. Oil-lubricated nailers, such as the Valu-Air T64C 16 Gauge 7/8-Inch to 2-1/2-Inch finish nailer, require regular pneumatic oil to protect internal piston seals and driver cylinders. Adding two to three drops of specialized non-detergent pneumatic tool oil directly into the male air inlet keeps internal components moving freely. Never use standard motor oil, WD-40, or penetrating solvents, as these chemicals degrade synthetic rubber O-rings rapidly.
In contrast, oil-less tools like the SENCO 18-gauge brad nailer utilize self-lubricating composite seals that do not require daily drops of oil. Introducing liquid lubricants into oil-free tools can attract dust and gum up delicate internal valving over time. Inspect the male plug threads and sealing surfaces for burrs or scratches every time you uncouple the tool. Wiping down the inlet fitting with a clean shop rag prevents abrasive grit from entering the internal cylinder chamber on your next connection.
Application-Specific Details for Strip and Finish Nailers
Metal connector nailers demand particular care during decoupling due to their specialized nose safety mechanisms. The Metabo HPT Pneumatic Strip Nailer NR38AK uses an exposed fastener tip as a positive safety guide for pre-punched structural metal plates. Its sequential drive mechanism ensures precision nail placement, but accidental pressure drops during operation could leave a fastener partially driven. Disconnecting the air line before inspecting the nose guide or clearing collation tape fragments prevents accidental cycling during structural framing tasks.
Finish nailers operating in fine cabinetry also require distinct post-disconnection handling to preserve workpiece surfaces. The Valu-Air T64C features a heat-treated aluminum housing and a 360-degree adjustable exhaust deflector to redirect exhaust air away from fine wood surfaces. Clearing remaining 16-gauge finish nails from the magazine after disconnecting prevents spring tension from binding the follower ribbon during transport. Storing the unhooked tool inside a dedicated protective carrying case prevents airborne sawdust from contaminating the air inlet port.
Preventing Hose Whip and Handling Residual Pressure
Hose whip is a significant hazard whenever long pneumatic runs are disconnected under full line pressure. A 50-foot or 100-foot rubber or polyurethane air hose acts like a secondary storage reservoir that holds considerable air volume. If you decouple the hose at the compressor manifold while the line remains pressurized, that stored air rushes out instantly and flails the heavy brass end violently. Securing the hose near the connector with a firm two-handed stance neutralizes the initial kickback force.
Installing safety exhaust couplers on your compressor manifold can eliminate hose whip hazards entirely during daily operation. These specialized safety fittings vent downstream line pressure through an internal baffle before releasing the male plug from the locking balls. This two-stage action ensures that the hose line is completely depressurized before the mechanical coupling separates. Investing in quality safety couplers significantly reduces workplace noise and protects nearby painted walls from accidental impacts.
Clearing Fastener Jams Safely After Disconnecting Air
Fastener jams represent the most common reason woodworkers and contractors need to unhook an air hose in the middle of a job. Attempting to clear a bent nail while the compressor remains connected is extremely dangerous because line pressure continues pressing against the driver blade. Once the air supply is detached, stored pneumatic energy leaves the head cylinder, allowing the piston to retreat naturally. You can then safely open the quick-clear nose latch or use the supplied hex wrenches to access the driver channel.
After extracting the jammed brad or strip nail, inspect the driver blade for bends or chipped corners before reconnecting line pressure. Cycle the magazine follower manually to confirm that collation strips glide smoothly along the aluminum guide rails without catching. Check that the safety contact element moves freely up and down against its internal return spring without sticking. Only when all mechanical pathways move freely should you reconnect your air supply and resume driving fasteners.
Draining Compressor Moisture and Long-Term System Storage
When your nailing project concludes and all tools are disconnected, completing a full pneumatic shutdown protects your entire equipment setup. Compressing ambient air naturally forces water vapor to condense inside the steel walls of your compressor tank. Leaving that moisture trapped inside creates internal rust scale that eventually migrates through air hoses and clogs delicate nailer valves. Opening the tank drain valve at the bottom of the vessel allows trapped water and remaining tank air to vent completely.
Store your uncoupled air hoses by coiling them loosely in wide loops rather than wrapping them tightly around compressor handles. Tight bending stresses the internal reinforcement braid and creates permanent kinks near the crimped fitting collars. Keep disconnected nailers inside clean, dry toolboxes or cases away from humid basement floors to prevent exterior corrosion. Adopting these methodical disconnection and cleanup habits keeps your pneumatic nailers running reliably across years of demanding woodworking and framing projects.
Inspecting Coupler O-Rings and Thread Seals
A damaged or brittle O-ring inside the female coupler is the leading cause of persistent air hissing at the tool connection. Each time you disconnect a nail gun, take a brief moment to peer into the open socket of the coupler to verify that the internal rubber seal remains intact and pliable. Grit, metal shavings, and repeated friction can tear this rubber ring, allowing pressurized air to bleed continuously during operation. Replacing a worn coupler O-ring costs very little and instantly restores airtight efficiency to your pneumatic line.
Inspect the male connector plug threaded into your nail gun handle for loose fittings or damaged thread sealant. Vibration from thousands of firing cycles can gradually loosen 1/4-inch National Pipe Taper threads, creating subtle leaks around the base. If you detect wobbling or air seepage, unthread the male fitting and clean the threads thoroughly with a wire brush. Apply fresh thread seal tape or liquid anaerobic pipe sealant before retightening the fitting firmly with an open-end wrench.
Safe Workflow Habits for Multi-Tool Workstations
In busy workshops where woodworkers alternate frequently between brad nailers, finish nailers, and framing tools, systematic disconnection practices prevent costly mix-ups. Always verify the operating pressure requirements of each individual tool before snapping it onto an active air hose. A finish nailer designed for 70 to 90 PSI should never be connected to a line pressurized to 120 PSI intended for framing strip nailers. Taking time to regulate manifold pressure between tool changes protects internal driver bumpers from excessive mechanical stress.
Maintaining a dedicated staging area for uncoupled pneumatic tools prevents accidental drops and keeps hose lines organized. Lay air hoses flat along designated walkways rather than leaving coiled loops that can snag on boots or scaffolding. Disconnecting your tools whenever you step away from your workstation ensures that no pressurized equipment sits unattended around children or visitors. These disciplined safety practices guarantee that your pneumatic tools deliver reliable precision without compromising workshop safety.
About the author
Tony Carrick is an experienced product researcher and writer specializing in tools, home improvement, automotive maintenance, and consumer equipment. With extensive experience reviewing tools and tackling hands-on renovation projects, he brings a buyer-focused perspective to compressor performance, usability, and overall value.