
How to Read Air Compressor Gauges: A Practical Guide for 2026
Learn how to read air compressor gauges accurately in October 2026 to monitor tank storage pressure, regulate tool line delivery, and maintain safe pneumatic equipment operation.
 By Clint DeBoer
Updated October 7, 2026
By Clint DeBoer
Updated October 7, 2026

Pneumatic tools require precise operating pressure to drive fasteners cleanly without damaging internal seals or stalling under load. Most workshop and jobsite compressors feature two distinct dials mounted on the manifold, which often confuses new operators trying to balance storage capacity against line delivery. Learning how to read air compressor gauges allows you to distinguish stored tank pressure from active regulated output, preventing premature motor cycling and pneumatic tool wear. Dial readings also provide immediate feedback on system health, highlighting air leaks or failing check valves before mechanical issues escalate.
Interpreting these dials correctly ensures that continuous-demand equipment like spray guns and impact wrenches receives steady airflow within manufacturer limits. Monitoring the tank pressure gauge and adjusting the regulated line pressure gauge protects delicate components while maximizing air storage efficiency. When you master how to read air compressor gauges, you can safely calibrate working pressure, diagnose sudden pressure drops, and replace faulty analog dials before undertaking demanding projects.
| Award | Product | ACR Score About ACR ScoreThe ACR Score is our own rating from 0 to 10, based on performance, design and build, ease of use, and value. It reflects independent research and is never influenced by manufacturers, retailers, or affiliate commissions. Learn more › | |
|---|---|---|---|
| Best Overall |
Therwen 4-Piece Compressor Valve & Gauge Set
|
8.8/10 | Buy |
| Best Value |
 DigitPro 250 PSI Digital Tire Inflator Gauge
|
8.4/10 | Buy |
| Best Budget |
 Performance Tool W10055 0-200 PSI Air Gauge
|
8.3/10 | Buy |
 Spurtar 10-120 PSI Tire Inflator Gauge
|
8.0/10 | Buy | |
 BOAISDHY 1.5-Inch 0-200 PSI Pressure Gauge
|
7.8/10 | Buy | |
| Best Premium |
 Hausse 1/4-Inch NPT Air Compressor Kit
|
7.8/10 | Buy |
Therwen 4-Piece Compressor Valve & Gauge Set
Designed for routine tank maintenance, this Therwen set bundles two brass 150 PSI relief valves with two stainless steel gauges. It utilizes standard 1/4-inch fittings to monitor tank pressure and automatically discharge excess air, oil, or water.
Pros
- Durable brass and stainless steel construction
- Standard 1/4-inch threading ensures broad compatibility
- Includes backup pairs for both valves and gauges
- Relief valve discharges air, water, and oil safely
Cons
- Gauge reads only up to 125 PSI
- Relief valve preset at 150 PSI is non-adjustable
- Standard operating temperature is capped at 176 degrees Fahrenheit
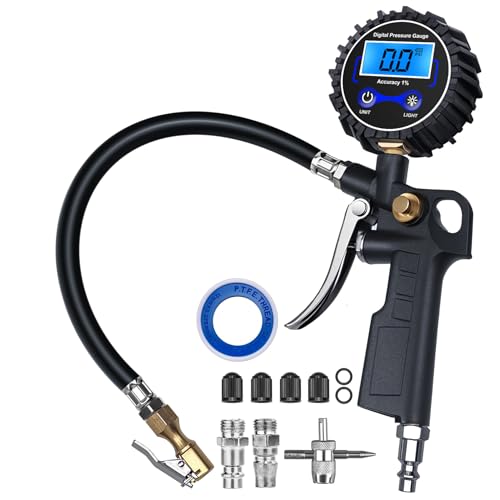
DigitPro 250 PSI Digital Tire Inflator Gauge
Equipped with a backlit screen and brass hardware, this versatile tool measures pressure up to 250 PSI with 0.1 PSI resolution. It is a practical workshop accessory for vehicle owners who already use an air compressor.
Pros
- Accurate readings within 1 percent across four units
- Durable brass and stainless steel build
- Backlit digital display for clear low-light visibility
- Combines checking, inflation, and deflation in one tool
Cons
- Requires a separate air compressor for inflation
Performance Tool W10055 0-200 PSI Air Gauge
Designed as a direct replacement for damaged gauges on air compressors and storage tanks, the Performance Tool W10055 provides straightforward pressure monitoring up to 200 PSI. Its bottom-mount configuration and high-contrast two-color dial allow for clear, quick readings.
Pros
- Easy-to-read high-contrast two-color dial
- Wide measurement range up to 200 PSI
- Compact and lightweight replacement unit
- Standard bottom-mount fitting for air tanks
Cons
- Bottom-mount design restricts installation to vertical positions
- Maximum 200 PSI rating unsuitable for higher pressure systems
Spurtar 10-120 PSI Tire Inflator Gauge
Equipped with an extended dual-head chuck and chrome-plated iron stem, this bayonet-style inflator gauge handles pressures up to 120 PSI. It provides a durable, all-in-one inflation and pressure-checking solution for standard passenger vehicles and dual-wheel trucks.
Pros
- Reaches difficult inner valves on dually tires easily
- Durable chrome-plated steel stem resists wear
- Comes with extra valve cores and repair tools
- Calibrated to 2 percent accuracy standards
Cons
- Two-pound scale increments limit fine-tuning precision
- 120 PSI maximum range excludes higher-pressure commercial tires
- Requires connection to a separate air compressor
BOAISDHY 1.5-Inch 0-200 PSI Pressure Gauge
Built for pneumatic tools, compressors, and sand filter lines, this BOAISDHY gauge monitors up to 200 PSI via a clear dual-unit readout. Its rugged steel housing and compact back mount make it well suited for tight equipment setups.
Pros
- Dual scales display both PSI and bar clearly
- Rugged steel case adds physical protection
- Compact size fits easily into tight manifolds
- Versatile compatibility with air, water, and oil lines
Cons
- Back-mount orientation limits viewing angles in some setups
- Small 1.5-inch dial face can be difficult to read from a distance
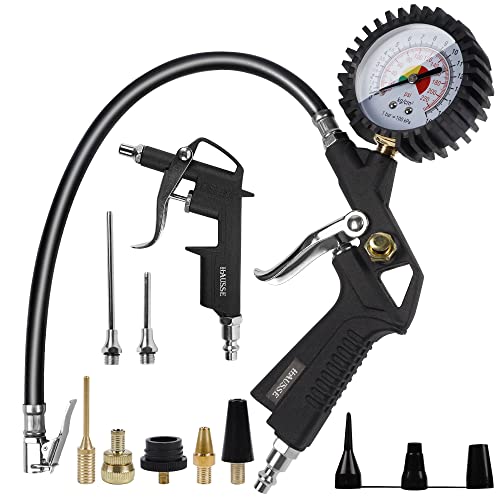
Hausse 1/4-Inch NPT Air Compressor Kit
This versatile accessory bundle combines an all-metal blow gun with a dial-gauge tire inflator designed for standard 1/4-inch NPT compressor connections. It is well suited for routine workshop maintenance, filling vehicle tires, and inflating sports gear.
Pros
- Durable, corrosion-resistant all-metal construction
- Gauge displays pressure even when unhooked from air
- Built-in release valve bleeds excess air easily
- Comprehensive accessory set fits bikes, tires, and balls
- Compatible with standard 1/4-inch NPT fittings
Cons
- Operating pressure capped at 140 PSI
- Analog dial gauge lacks digital precision
Comprehensive Guide to Reading and Calibrating Air Compressor Gauges
Pneumatic systems rely on accurate pressure indicators to deliver the mechanical force required for fastening, inflating, and operating shop machinery. Air compressor gauges provide immediate visual data regarding stored pneumatic energy and working line output. Misinterpreting these readings can cause inadequate tool performance, premature motor cycling, or dangerous over-pressurization of downstream hoses. Understanding how each dial functions ensures your equipment operates reliably within specified safety margins.
Deciphering the Two Gauges on Your Air Compressor Manifold
Most standard portable and stationary air compressors feature two distinct pressure gauges mounted directly beside the pressure switch and regulator assembly. One dial connects to the receiver vessel and is known as the tank pressure gauge. The adjacent dial sits downstream from the adjustment valve and is designated as the regulated working pressure gauge. Recognizing the distinct role of each indicator prevents confusion when preparing tools for operation.
The tank pressure gauge measures stored potential energy inside the reservoir as the pump compresses ambient air. This needle climbs steadily from zero until reaching the factory-set cut-out limit, which typically ranges between 125 and 175 PSI on consumer compressors. As you use air, stored tank volume decreases until pressure drops to the cut-in point, prompting the motor to restart. The tank dial constantly fluctuates between these two thresholds throughout your working session.
In contrast, the regulated line pressure gauge reflects the restricted airflow routed directly into your output coupler and air hose. Turning the regulator knob adjusts an internal spring and diaphragm mechanism, allowing you to tailor line output to a specific tool requirement. While the tank may store air at 150 PSI, a brad nailer might require only 90 PSI to seat fasteners flush. Monitoring the regulated gauge ensures you deliver steady working pressure without stressing tool seals.
Understanding Pressure Scales, Measurement Units, and Dial Increments
Analog air compressor gauges utilize internal curved Bourdon tubes that straighten under pneumatic force, rotating a needle across a calibrated dial face. The predominant measurement unit on North American gauges is pounds per square inch, universally abbreviated as PSI. High-visibility dials, like the two-color face on the Performance Tool W10055 replacement gauge, use contrasting graphics to help operators read pressure levels from across the workshop.
Many modern replacement gauges, such as compact BOAISDHY dials, display dual scales featuring both imperial PSI and metric Bar. One Bar represents atmospheric pressure at sea level, roughly equivalent to 14.5 PSI. When an imported pneumatic tool specifies an operating ceiling of 6.2 Bar, you can reference the dual-scale face to set your regulator near 90 PSI. Paying attention to dial labels prevents confusing Bar with PSI, which would result in severe under-pressurization.
Hash mark increments vary significantly depending on the total measuring capacity of the dial. Gauges rated from 0 to 125 PSI often feature minor tick marks every 2 PSI, allowing precise calibration for low-pressure paint sprayers. Higher-capacity dials spanning 0 to 200 PSI or 0 to 250 PSI frequently space graduations by 5 or 10 PSI increments. Reading these wider scales requires carefully aligning the pointer with the nearest numeric division to maintain proper operating limits.
Step-by-Step Procedure for Adjusting Regulated Output Pressure
Calibrating line delivery requires a disciplined sequence to ensure the regulator seats correctly against internal line pressure. Begin by closing the tank drain valve and starting the electric motor with the regulator turned down. Allow the compressor to pump until the pressure switch automatically shuts off the motor at the cut-out threshold. Verify on the tank gauge that stored pressure matches the manufacturer specification before adjusting line delivery.
Next, attach your air hose and chosen pneumatic tool to the 1/4-inch quick-connect output coupler on the manifold. Turn the regulator adjustment knob counterclockwise until the regulated line pressure gauge settles near zero. Slowly rotate the knob clockwise, which compresses the internal spring and allows air to flow through the manifold orifice. Watch the regulated needle climb steadily until it aligns exactly with your target operating pressure.
Always finalize your pressure setting with a clockwise adjustment to maintain proper tension on the regulator spring. If you accidentally rotate past your desired PSI, turn the knob counterclockwise half a turn and trigger the tool to bleed excess line pressure. Once the needle drops below the desired mark, rotate clockwise once more until the needle rests on the target. This technique prevents diaphragm creep and maintains stable delivery throughout extended use.
Dynamic Pressure Drop versus Static Pressure Readings
Operators frequently notice that a regulator gauge displays 90 PSI while the tool sits idle, but plummets significantly once the trigger is engaged. This drop illustrates the difference between static potential pressure and dynamic operating pressure in an active air line. Static pressure represents trapped force in a closed system where no air moves through the hose. Dynamic pressure measures the actual force remaining while air exhausts through the tool motor.
Friction along the interior surface of air hoses and manifold fittings causes unavoidable flow resistance during operation. Using an undersized 1/4-inch hose over a 50-foot run restricts volume, causing dynamic line pressure to drop dramatically under continuous air demand. High-draw pneumatic tools, such as rotary sanders or impact wrenches, suffer performance loss when dynamic pressure drops below operating thresholds. Inadequate line volume starves the tool mechanism even when static dial readings appear adequate.
To set accurate operating pressure, observe the regulated line gauge while actively running the tool under simulated working conditions. If the needle falls from 90 PSI to 75 PSI upon trigger engagement, increase the regulator clockwise until the running needle holds at 90 PSI. Upgrading to a 3/8-inch internal diameter air hose and high-flow fittings significantly reduces dynamic drop across long distances. This adjustment ensures your pneumatic tools receive rated force during continuous demand cycles.
Reading Tire Inflator and Inline Pressure Gauges
Point-of-use pressure accessories require slightly different reading techniques compared to fixed compressor manifold dials. Heavy-duty tire inflator attachments, such as the Spurtar 10-120 PSI gauge with ANSI B40.1 Grade B accuracy, often utilize sliding bayonet indicator bars. When you press the dual-head chuck firmly onto a tire valve stem, internal tire pressure extends the calibrated bar outward. You read the measurement by noting the engraved graduation line aligned with the sleeve housing.
Analog dial inflators, such as those found in the Hausse air accessory kit, use compact circular faces registering up to 220 PSI. To obtain a true tire reading, firmly seat the chuck onto the valve stem without pulling the inflation trigger handle. Integrated thumb-operated deflation valves permit venting excess air while monitoring the dial needle settle toward manufacturer recommendations. Releasing trapped air incrementally ensures you achieve balanced inflation across all vehicle tires.
Digital inflator gauges, like the DigitPro 3-250 PSI unit, offer backlit LCD screens that eliminate analog needle interpretation errors. These battery-powered tools provide numeric readouts with 0.1 PSI resolution and allow switching between PSI, Bar, and kilopascals. Digital readouts respond rapidly to pressure changes, providing clear visibility during evening roadside repairs or low-light garage tasks. Regardless of gauge style, always measure tire pressures when rubber casings are cold to avoid heat-induced inflation spikes.
Diagnosing Compressor Faults Through Gauge Symptoms
Observing needle motion provides critical diagnostic clues regarding the mechanical health of your compressor pump and valves. A regulated gauge needle that flutters wildly during tool use indicates a damaged regulator diaphragm or debris lodged in the valve seat. Fluttering delivery causes erratic nail penetration depths and uneven paint atomization in finishing setups. Disassembling and cleaning the regulator body often resolves needle instability and restores consistent airflow.
When a tank gauge needle steadily declines while the compressor remains unplugged and idle, air is escaping from the system. Applying a mild soap solution across manifold fittings, drain petcocks, and the safety valve helps pinpoint elusive bubbles. If air continuously hisses from the unloader valve port after motor shut-off, the tank check valve is leaking internally. Stored air escapes backward through the check valve seat, venting out the unloader port until the reservoir empties.
A compressor motor that runs continuously while the tank gauge needle stalls below cut-out pressure signals restricted intake airflow or worn pump seals. Clogged air filters, cracked reed valves, or worn piston rings reduce pump efficiency, preventing the unit from reaching full pressure. If the tank gauge climbs past normal cut-out pressure without motor shutdown, immediately disconnect electrical power. A sticking pressure switch can over-pressurize the tank, forcing the emergency safety relief valve to discharge.
Selecting and Installing Replacement Pressure Gauges
Intense vibration and accidental jobsite impacts can degrade internal Bourdon tubes over time, leading to inaccurate dial readings. When selecting a replacement gauge, match the male pipe thread size, which is commonly 1/8-inch or 1/4-inch National Pipe Taper. The Performance Tool W10055 features a bottom-mount configuration intended for top-mounted manifold blocks. Conversely, compact BOAISDHY gauges feature rear center-back mountings suited for recessed metal consoles on portable pancake compressors.
Ensure the maximum scale on the replacement dial comfortably exceeds the maximum pressure rating of your compressor system. A Therwen 0-125 PSI gauge provides excellent resolution for regulated line output, but cannot withstand 150 PSI tank storage. Installing an under-rated gauge on a primary tank port risks rupturing the internal Bourdon tube during normal compression cycles. For storage tanks operating up to 150 PSI, select a gauge rated to at least 200 PSI to maintain a safety buffer.
Before removing a faulty gauge, drain the tank completely until both dial needles rest flat against zero stops. Apply two wraps of PTFE thread sealing tape clockwise around the male threads of the replacement gauge to prevent micro-leaks. Thread the gauge into the manifold port by hand, then tighten it using an open-end wrench on the brass square base. Never apply turning force to the plastic or steel dial housing, as twisting the case damages internal gearing.
Maintenance Protocols and Safety Verification
Maintaining gauge reliability requires protecting internal pneumatic channels from moisture contamination and rust particles. Compressing ambient air forces humidity to condense into liquid water, which collects at the base of the tank. If neglected, moisture enters manifold passages, corroding delicate brass gears and causing needles to stick or jump erratically. Opening the bottom tank drain valve after every work session expels accumulated water and protects precision gauge mechanisms.
Regular safety valve testing verifies that your compressor maintains emergency over-pressure protection independent of gauge readings. Components like the Therwen 150 PSI safety relief valve feature a manual pull ring designed for periodic testing. Pulling this ring briefly with the tank partially pressurized verifies that the spring-loaded brass seal releases freely without binding. Never plug, modify, or remove an emergency relief valve, even if a gauge indicates pressures below the rated pop-off point.
Periodic calibration checks ensure your analog manifold gauges continue reporting true pneumatic pressure values. Comparing manifold readings against an accurate digital gauge or calibrated inflator helps identify gradual mechanical drift in older analog dials. If an analog needle fails to return to zero when the tank is depressurized, replace the gauge immediately. Establishing disciplined inspection habits ensures your pressure monitoring equipment remains dependable, accurate, and safe across years of workshop duty.
Understanding the operational distinction between stored tank energy and regulated tool output is central to safe pneumatic equipment operation. Watching dial behavior during tool use allows you to compensate for dynamic pressure drops and catch mechanical issues early. By maintaining clean manifold lines, checking safety relief valves, and replacing inaccurate dials promptly, you protect your pneumatic tools from costly damage. These straightforward habits ensure that your air compressor operates safely and delivers dependable power on every project.
About the author
Clint DeBoer is an experienced tool-industry specialist with decades of involvement in technical media, hands-on product evaluation, and testing methodology. His focus on performance, practical usability, and data-driven comparisons makes his expertise highly relevant to professional air compressors, pneumatic tools, and workshop equipment.