
How to Assemble Air Compressor Accessories: Practical Setup Guide for 2026
How to assemble air compressor accessories safely with leak-free seals and proper quick-connect fittings in this October 2026 shop guide.
 By Glenda Taylor
Updated October 7, 2026
By Glenda Taylor
Updated October 7, 2026

Unexpected dynamic pressure loss or persistent hissing from fresh pneumatic line connections usually stems from small assembly mistakes rather than faulty hardware. Learning how to assemble air compressor accessories correctly protects your pneumatic tools, reduces unnecessary pump cycling, and ensures maximum CFM volume delivery at working pressures. Whether you are setting up a flexible polyurethane air hose, attaching high-flow blow guns, or plumbing threaded quick-connect couplers, precise mechanical assembly creates an airtight pneumatic system. Taking the time to prepare each connection prevents irritating micro-leaks and keeps your compressor running cool and efficient.
Most workshop setups rely on standard 1/4-inch NPT threaded connections paired with Industrial Type M quick-connect couplers and plugs. Achieving a reliable, leak-free joint requires understanding how tapered pipe threads wedge together, where to apply PTFE thread seal tape, and how to properly seat tire chucks and blow gun nozzles. Using durable components like solid brass fittings and plated steel plugs minimizes wear across frequent tool swaps. With the right tools and orderly assembly methods, you can build a versatile air distribution setup that powers everything from tire inflators to heavy-duty impact wrenches without wasting compressed air.
| Award | Product | ACR Score About ACR ScoreThe ACR Score is our own rating from 0 to 10, based on performance, design and build, ease of use, and value. It reflects independent research and is never influenced by manufacturers, retailers, or affiliate commissions. Learn more › | |
|---|---|---|---|
| Best Overall |
LUMITECO 11-Inch Swivel Tire Inflator Hose
|
9.1/10 | Buy |
| Best Budget |
 LUMITECO 33-Inch Tire Inflator Extension Hose Kit
|
9.1/10 | Buy |
 JASTIND Industrial Air Blow Gun Kit
|
8.8/10 | Buy | |
| Best Value |
 SARDVISA 13-Piece Air Blow Gun and Nozzle
|
8.8/10 | Buy |
| Best Premium |
 FYPower 18-Piece Air Compressor Accessories Kit
|
8.6/10 | Buy |
 LUMITECO 2-Pack Closed Flow Ball Foot Air Chuck
|
8.1/10 | Buy | |
 SARDVISA 20-Piece Air Compressor Tool Kit
|
8.1/10 | Buy | |
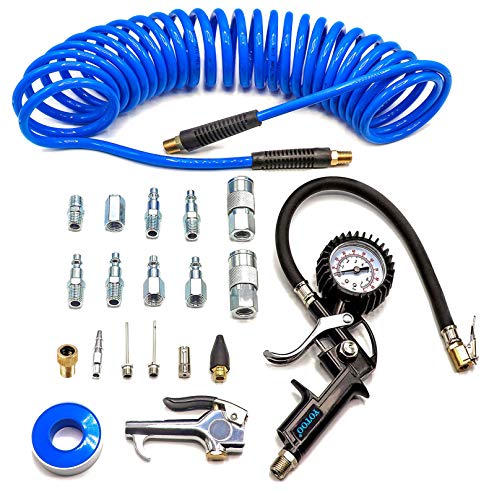 YOTOO 20-Piece Air Compressor Accessory Kit
|
7.8/10 | Buy |
LUMITECO 11-Inch Swivel Tire Inflator Hose
This braided extension hose upgrades portable inflators with a 360-degree swivel lock-on chuck and a protective heat sleeve. It provides a secure, leak-free connection for bicycles, cars, and motorcycles with awkward valve angles.
Pros
- Swivel chuck rotates 360 degrees for awkward valve angles
- Rubber sleeve protects hands from hot compressor fittings
- Converts twist-on connections into quick thumb-press lock-on chucks
- Comes with Presta adapter and extra conversion nuts
Cons
- Short 11-inch length provides limited extra reach
- Open-flow chuck requires active pump connection to prevent deflation
LUMITECO 33-Inch Tire Inflator Extension Hose Kit
The LUMITECO 33-inch tire inflator extension hose adds generous reach and hands-free convenience to portable air pumps, featuring a built-in pressure release button and a secure lock-on chuck. It is an ideal, budget-friendly upgrade for garage mechanics, cyclists, and homeowners needing quick tire and sports gear inflation.
Pros
- Generous 33-inch length keeps portable pumps resting flat on the ground during tire inflation
- Integrated air release button makes fine-tuning tire pressure simple without removing the nozzle
- Quick-clamping thumb-lock chuck prevents air leakage during inflation cycles
- Complete 7-pack accessory assortment handles bicycle, automotive, and sports equipment needs
Cons
- Designed with 0.305-inch x 32 TPI fine threads rather than standard 1/4-inch NPT workshop compressor fittings
- Lock-on thumb lever requires precise alignment on short or deeply recessed valve stems for an airtight seal
- Thumb lever mechanism may feel stiff to operate straight out of the package in cold garage conditions
JASTIND Industrial Air Blow Gun Kit
The JASTIND Industrial Air Blow Gun delivers powerful workshop blow-off performance with a durable chromed zinc alloy body, an adjustable brass airflow nozzle, and two protective-tipped extensions. It is an affordable, metal-built pneumatic accessory ideal for DIYers, mechanics, and woodworkers needing versatile cleanup reach.
Pros
- Solid all-metal zinc alloy and copper construction resists cracking compared to plastic blow guns
- Adjustable brass nozzle provides convenient airflow throttling right at the tool tip
- Protective rubber tips on extension wands help prevent scratching delicate finishes and sensitive components
- Integrated top hook makes bench and wall storage simple and accessible
Cons
- Does not state OSHA safety relief bypass compliance, so line pressure should be regulated safely before use
- All-metal zinc alloy body can transfer cold to the hand during extended continuous blowing sessions
- Specific quick coupler interchange style is not detailed in specifications, requiring fit verification for some shop air lines
SARDVISA 13-Piece Air Blow Gun and Nozzle
The SARDVISA 13-Piece Air Blow Gun Set delivers multi-purpose workshop cleanup and light inflation capability with an all-metal chrome-plated body and standard 1/4-inch NPT connection. It is an affordable, versatile starter kit for garage DIYers, hobbyists, and woodworkers needing flexible nozzle options at the workbench.
Pros
- All-metal chrome-plated body offers dependable durability compared to cheap molded plastic alternatives
- Comprehensive 13-piece accessory bundle covers machinery cleaning, crevice blowing, and small inflation tasks
- PVC-coated thumb lever provides comfortable control during repetitive workbench blow-offs
- Supplied Teflon tape and thread adapters make immediate out-of-the-box setup straightforward
Cons
- Lacks OSHA-compliant side-relief bypass venting, requiring users to manually regulate compressor line pressure for safety
- Alloy nozzle extensions and thread converters require careful hand alignment to avoid cross-threading
- Thumb-lever actuation can cause hand fatigue during prolonged, continuous blowing compared to full-handle pistol grips
FYPower 18-Piece Air Compressor Accessories Kit
The FYPower 18-Piece Air Compressor Accessories Kit combines a 25-foot recoil poly hose rated at 120 PSI with standard Industrial Type M brass and steel fittings, a 100 PSI tire gauge, and multi-tip blow gun attachments. It serves as an accessible starter set for garage DIYers and homeowners handling benchtop cleanups and routine tire maintenance.
Pros
- Comprehensive all-in-one starter bundle covers inflation, dusting, and standard airline connections
- Self-coiling 25-foot polyurethane recoil design retracts automatically to prevent shop floor clutter
- Standard 1/4-inch Industrial Type M couplers and plugs match standard American garage air setups
- Supplied with solid brass fittings and thread sealing tape to help prevent immediate airline leaks
Cons
- The 120 PSI maximum working pressure rating is unsuitable for high-pressure systems operating above standard home compressor thresholds
- The 1/4-inch inner diameter recoil hose introduces airflow restriction that may starve continuous high-CFM air tools like impact wrenches or grinders
- Recoil polyurethane hoses pull back with spring tension during extended reaching across large work areas
LUMITECO 2-Pack Closed Flow Ball Foot Air Chuck
The LUMITECO 2-Pack Ball Foot Air Chuck Set features a closed-flow internal shut-off valve rated up to 300 PSI, making it an excellent addition to tire inflator gauges and shop air drops. Designed with standard 1/4-inch FNPT threads and supplied with quick-connect plugs, this kit provides a dependable, leak-resistant solution for automotive enthusiasts and garage DIYers.
Pros
- Internal closed-flow valve prevents air discharge when disconnected, conserving compressor tank pressure
- Rated up to 300 PSI maximum pressure for wide versatility across passenger cars and light commercial vehicles
- Complete installation kit includes two male quick-disconnect plugs and thread sealing Teflon tape
- Standard 1/4-inch FNPT threads ensure straightforward compatibility with aftermarket inflator gauges and hose whips
Cons
- Closed-flow design is unsuitable for direct connection to small portable 12-volt inflators that lack an integrated pressure switch or trigger
- Compact ball-foot profile can be difficult to position on deeply recessed dually truck wheels compared to extended straight-foot chucks
- Base metal alloy is not explicitly listed, requiring careful alignment during threading to avoid cross-threading over time
SARDVISA 20-Piece Air Compressor Tool Kit
This 20-piece air compressor accessory set from SARDVISA bundles standard 1/4-inch NPT fittings, an air blow gun, tire chucks, and pre-applied thread sealant for basic garage maintenance. It serves as an accessible starter kit for DIY homeowners and hobbyists setting up everyday pneumatic lines.
Pros
- Wide selection of essential air line fittings, adapters, and inflation attachments in one package
- Standard 1/4-inch NPT threading fits standard U.S. home shop air tools and compressors
- Pre-applied thread sealant and included PTFE tape assist with leak-free installation
- Solid brass ball air chuck provides dependable durability at the valve stem connection
- Lightweight total set weight of approximately 1.21 pounds stores easily in portable toolboxes
Cons
- Light-duty chrome-plated hardware is best suited for home hobbyists rather than heavy commercial fabrication shops
- Manufacturer does not specify maximum working PSI or continuous CFM flow ratings
- Air blow gun and nozzles do not have documented OSHA safety pressure-relief certifications
YOTOO 20-Piece Air Compressor Accessory Kit
This 20-piece starter set bundles a 25-foot polyurethane hose, an integrated tire inflator gauge, and versatile blow gun attachments for home garage projects. It offers a practical all-in-one setup for DIYers inflating tires, sports equipment, and clearing workshop debris.
Pros
- Durable polyurethane hose resists kinking under pressure
- Corrosion-resistant aluminum tire gauge casing
- Solid brass swivel fittings reduce hose twisting
- Includes essential thread seal tape and multiple adapters
Cons
- 25-foot hose length limits reach in larger workspaces
- 100 PSI gauge ceiling excludes high-pressure commercial tires
A Practical Step-by-Step Blueprint on How to Assemble Air Compressor Accessories
Assembling a pneumatic accessory system requires a logical progression from the compressor tank outlet to the working tool end. Every fitting, hose, and attachment must handle your compressor system working pressure while maintaining an airtight seal under dynamic vibration. Taking a methodical approach prevents frustrating pressure drops and stops micro-leaks before you pressurize the air tank. The following instructions break down the mechanical connections, sealing techniques, and component alignments needed to build a durable pneumatic line.
Understanding Thread Standards and Sizing Before Assembly
Standard North American pneumatic setups use 1/4-inch National Pipe Taper (NPT) threads across hoses, couplers, blow guns, and inflator chucks. Unlike parallel straight threads that seal against an internal washer or O-ring, NPT threads are cut on a slight 1-degree 47-minute taper. As you thread a male fitting into a female port, the flanks of the threads wedge tighter together to form a mechanical interference fit. Because microscopic gaps remain along the thread roots and crests, tapered pipe threads always require an appropriate sealant compound to become completely airtight.
Mistaking thread profiles is a frequent reason for damaged fittings and persistent air leaks. Parallel threads such as British Standard Pipe Parallel (BSPP) or metric fittings do not mate correctly with tapered NPT fittings without dedicated thread conversion adapters. Forcing mismatched thread styles together strips the threads and ruins cast metal tool housings. Inspect your accessory ports to verify whether you are working with male NPT (MNPT) or female NPT (FNPT) connections before applying thread tape or tightening wrenches.
Proper Application of PTFE Thread Seal Tape and Liquid Sealants
Applying PTFE thread seal tape correctly makes the difference between an airtight joint and a frustrating leak. Always wrap the tape clockwise around the male threads when facing the open end of the fitting so the tape stays tight as you screw the fitting into the female port. Wrap the tape under moderate tension for three to four complete passes, allowing the film to conform snugly into the thread valleys. Most importantly, leave the first one or two leading threads completely bare. Leaving the leading threads exposed prevents sheared ribbons of plastic tape from migrating downstream where they can foul delicate regulator seats or air tool internal valves.
Some modern air fitting sets, such as the zinc-plated components found in multi-piece pneumatic kits, arrive with pre-applied thread sealant on the male threads. This factory coating provides an effective barrier, but inspect the threads to ensure the sealant has not chipped away during packaging or transport. If you notice bare patches on pre-coated fittings, apply two wraps of PTFE tape over the area for extra sealing insurance. When working with permanent shop drops or high-vibration tool manifolds, anaerobic liquid thread paste can also be used, provided you allow the compound adequate curing time before applying full line pressure.
Connecting Hoses to the Compressor Tank and Air Drops
The primary link between your compressor and your workspace is the main air hose. Start by inspecting the compressor discharge manifold or pressure regulator outlet port to confirm its thread size and cleanliness. Thread a 1/4-inch FNPT quick-connect coupler or direct hose end into the discharge port using two open-ended wrenches. Using two wrenches is essential: one wrench stabilizes the compressor regulator body, while the second wrench tightens the fitting. This dual-wrench technique prevents twisting or fracturing the delicate aluminum casting of the compressor pressure switch or regulator block.
Selecting and securing the hose itself depends on your shop layout and working demands. Lightweight recoil poly air hoses stretch easily for bench work and retract automatically to keep floors clean, whereas straight polyurethane air hoses provide higher flexibility and lay flat without coiling memory. Look for hoses equipped with solid brass swivel ends and molded bend restrictors near the fittings. Bend restrictors relieve mechanical stress right behind the crimped ferrule, preventing kinks and structural failure during repetitive movements around the workbench or vehicle.
Installing Quick-Connect Couplers and Plugs on Pneumatic Lines
Quick-connect systems allow rapid tool changes without shutting off the main air supply. The female coupler contains an internal shut-off valve and spring-loaded ball bearings, while the male plug features a shaped nose that pushes open the internal valve when seated. In standard North American workshops, the Industrial Type M profile is the prevailing standard. Always install the female coupler on the air supply side (the end of the hose coming from the tank) so that air stops flowing automatically whenever a tool is disconnected.
Install the male quick-connect plug directly into the 1/4-inch female inlet of your air tools, blow guns, or tire inflators. Wrap the male threads with PTFE tape, start threading by hand to avoid cross-threading, and tighten with an appropriately sized wrench until snug. Avoid over-torquing brass fittings, as brass is softer than steel and can deform or crack across the hex shoulder if subjected to excessive leverage. Once installed, test the connection by pushing the male plug firmly into the female coupler until the outer sleeve clicks forward into its locked position.
Assembling Blow Guns, Extension Nozzles, and Specialty Tips
Pneumatic blow guns serve as fundamental cleaning tools in any workshop, but assembling them requires attention to nozzle threading and lever ergonomics. Begin by threading a 1/4-inch MNPT quick plug into the base of the blow gun handle using PTFE tape. Hand-tighten the plug, then apply a final snug turn with a wrench while holding the cast gun body firmly in your palm. All-metal blow gun bodies with chrome-plated zinc or copper alloy internals offer superior wear resistance against constant trigger cycling compared to budget plastic options.
Next, assemble your chosen nozzle into the front discharge port of the blow gun. Many multi-piece kits include interchangeable tips such as rubber non-marring nozzles, tapered high-volume tips, and extended reach steel tubes. If your blow gun kit uses intermediate thread converters, secure the converter first before threading on specialized tips like sports ball needles or pagoda nozzles. Ensure any knurled brass locking collar on adjustable flow nozzles is properly seated so air discharge volume can be modulated smoothly with the thumb-press lever.
Setting Up Tire Inflators, Ball Chucks, and Valve Adapters
Tire inflation accessories require specific assembly based on whether you are using a dedicated inflator gauge or an inline air line chuck. Closed-flow air chucks, like standard ball foot chucks, incorporate an internal check valve that only releases compressed air when pressed firmly onto a tire valve stem. To assemble a closed-flow chuck, apply PTFE tape to a 1/4-inch male quick plug and screw it into the chuck female base. This modular setup allows you to snap the tire chuck directly onto your main hose coupler in seconds.
Flexible extension hoses with 360-degree rotating chucks and thumb-lock levers provide significant convenience when working in cramped wheel wells. Assemble these extension whips by threading the standard Schrader adapter onto your inflator gauge stem, ensuring built-in rubber sealing gaskets are properly centered. If you maintain bicycles with Presta valves, screw a brass Presta to Schrader valve adapter onto the valve or chuck end. The internal rubber O-ring inside the adapter forms an airtight seal against the narrow Presta stem, allowing seamless inflation using standard shop air accessories.
System Pressurization, Leak Verification, and Bubble Testing
Once all accessories, hoses, and quick-connect fittings are assembled, you must verify the structural integrity of every threaded joint. Turn on the air compressor and allow the receiver tank to build pressure until the pressure switch reaches its cut-out setpoint. Next, slowly open the regulator knob to supply air down the hose line to your attached accessories. Pressurizing the line gradually prevents sudden pressure spikes that could jolt unseated fittings or blow unsealed threads.
Conduct a thorough leak inspection by mixing a few drops of liquid dish soap with water in a spray bottle. Spray the soapy solution generously over every threaded NPT joint, crimped hose collar, and quick-connect coupling. If bubbles form and expand around a connection, air is actively escaping through the threads or around the coupler sleeve. Depressurize the line immediately, loosen the leaking joint, apply fresh PTFE tape with proper clockwise overlap, and retighten securely before repeating the bubble check.
Depressurization Safety, Maintenance, and Field Disassembly
Safe operation requires strict depressurization habits whenever you change hard-plumbed accessories or pack away equipment. Never attempt to unthread NPT fittings while the air line remains under line pressure, as escaping air can violently propel loose components. Before servicing fittings, shut off the compressor regulator or tank valve and bleed all residual pressure by squeezing an attached blow gun or pressing an open tire chuck. Only when the line pressure gauge drops completely to zero should you take wrenches to your threaded assemblies.
Routine maintenance prolongs the operating life of your air accessories and keeps connections operating smoothly. Inspect the internal Buna-N rubber O-rings inside female quick-connect couplers regularly for cracks, flattening, or foreign debris. Keep male plugs clean of dirt and metal shavings to prevent scoring the internal valve seals of your couplers. When coiling polyurethane or recoil hoses for storage, avoid tight bends that exceed the natural radius of the hose jacket, and hang air accessories by dedicated metal hanging hooks in a dry environment.
Assembling pneumatic accessories with careful thread preparation, correct tightening methods, and systematic leak checks guarantees dependable workshop performance. Taking the time to seat your quick couplers, wrap PTFE tape properly, and match fitting profiles eliminates irritating air losses and keeps your pneumatic tools running at full power. With these fundamental assembly steps completed, your air compressor setup will deliver safe, efficient, and consistent airflow across every workshop task.
About the author
Glenda Taylor has extensive experience in residential construction, remodeling, home improvement, and tool use. Her practical approach to equipment evaluation focuses on usability, performance, safety, and value—helping DIYers and workshop users make better-informed decisions about compressors and related tools.